
Aircraft Spruce Canada
Brantford, ON Canada
Corona, CA | Peachtree City, GA
Chicago, IL | Wasilla, AK
 Aircraft Spruce Canada
- Wishlists
- 1-877-795-2278
- Contact Us

- Photo may represent series and not specific product
- SHARE


Overview
|
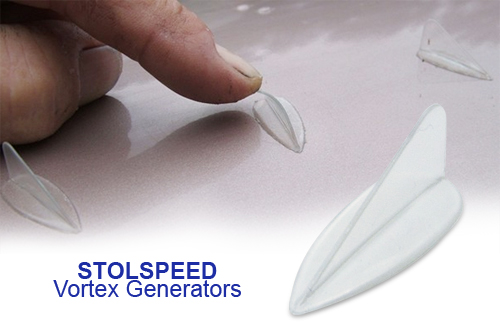
This is a really good way to demonstrate the difference that VGs make to the airflow. Notice that outer portion of the wing, behind the VGs, doesnt stall at all, and the airflow remains attached and smooth. Notice that the inner portion of the wing, without VGs, stalls suddenly and the disruption immediately spreads over the whole portion. But note that the disruption doesnt spread to the portion of the wing behind the VGs. Vortex generators (VGs) are well-proven for better low-speed handling, softening the stall characteristics, and lowering the stall speed, which makes it easier to do slower, gentler landings. Stolspeed VGs are streamlined for less drag and better appearance than other VGs. Stolspeed VGs have no sharp points and are flexible, so it's easier to wash or cover the wings. The special 3M adhesive is removable without damaging aircraft paint. Stolspeed VGs have been completely redesigned from all other vortex generators on the market to be much more user-friendly and better looking, while still retaining the aerodynamic effectiveness that vortex generators are renowned for. See Design. Stolspeed VGs have a very slim rounded fin to give them good flexibility, and a rounded, tapered base that flows into the wing surface. They really do look like theyre meant to be a part of the wing rather than a stick-on. In clear material theyre almost invisible. Brush your hand over Stolspeed VGs and you can feel the flexibility. .....like stiff resilient feathers..... Other vortex generators are sharp, angular and rigid, and are a real nuisance when refuelling, washing, or covering wings you wouldnt dare brush your hand over them! |
Installation
Installing Stolspeed Vortex Generators
Flight Testing
Its essential to do proper flight testing before and after installing any VGs.
Record the results, dont depend on memory! Not only will you be able to measure the differences, but youll learn a whole lot about the handling of your aircraft.
Preferably select a time when the weather is looking stable for a couple of days (ie- a large high pressure cell spreading over your area). Do the first flight tests without VGs early one morning, install the VGs during the day, and flight test again with VGs early next morning when conditions will be consistent.
Instructions for the flight testing procedure are at Fight Testing.
CofG
It's also essential to establish that the CofG of your aircraft is correct before installing VGs. And here we're talking about the actual loaded CofG as it is for flight right now, not just the empty aircraft, or calculations way back when it was built. I keep running across aircraft owners seeking to use VGs to correct defects in handling which are really due to CofG problems - some due to additions over time - some obviously could never have passed a proper weight and balance at any time! (Auto engines need special attention...)
It's a trap, that most aircraft will fly fine under power even if the CofG is way out, but lose that power and reality bites - either can't get the nose up for a landing flare, or even worse, can't get the nose down in a stall .......
I know that very few aircraft owners ever do a weight and balance other than when it was built, but it sure is worthwhile exercise - now is a good time to do it!
Instructions for Installing Stolspeed VGs on your aircraft.
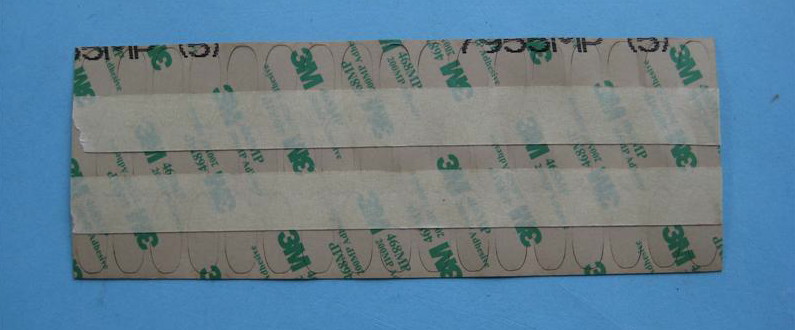
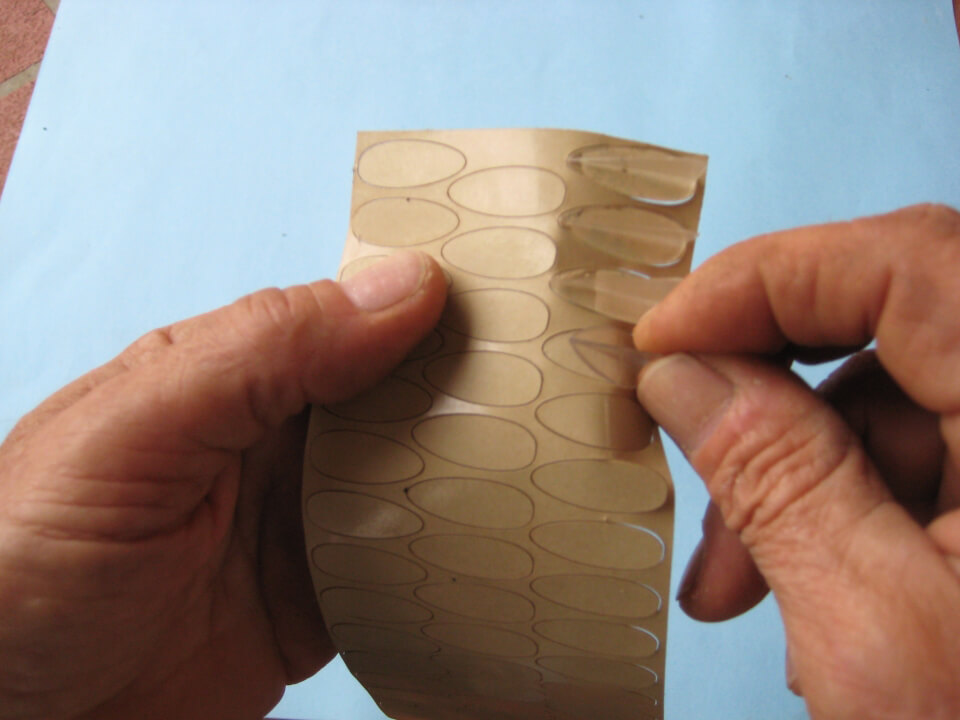
First itll be necessary to apply the special adhesive to the VGs.This adhesive comes as a thin sheet in a sandwich between two backings. Its a solvent-free, acrylic adhesive that wont damage any paint surface. Once firmly pressed onto a clean surface it bonds really well, but still has flexibility. Sudden impacts will not knock it loose, but it can be peeled away by pulling steadily on the VG and sliding a razor blade under. To remove any remaining adhesive from the surface, just rub with your thumb and roll it away in a little rubbery ball. Its a perfect adhesive for this purpose!
The sheets of adhesive now come already laser cut to the footprint of each VG. The laser often cuts through the backing of the adhesive as well, so to keep all the parts stable, place a couple of runs of masking tape across the backing (the printed side), as shown below.
With the tip of a trimming knife, lift the front tip of the covering layer from a footprint.
Wipe the bases of all the VGs with methylated spirits, also called denatured alcohol or methyl hydrate.Place a VG onto each footprint of the adhesive. Holding each VG, rub the backing with a fingernail to press the adhesive firmly onto the VG and expel any air bubbles.
Hold each VG by the vertical wing and bend the adhesive backing away, starting at the tip of the VG.This should lift the VG, with the adhesive stuck to it, from the backing.
The ideal temperature for applying this adhesive to the wing surface is between 60°F(15°C) and 100°F(38°C). If the temperature is below 50°F(10°C) the adhesive may not 'flow' properly for a good bond. If it's too cool use a heat gun or hair dryer to carefully warm both the wing surface and the VG.
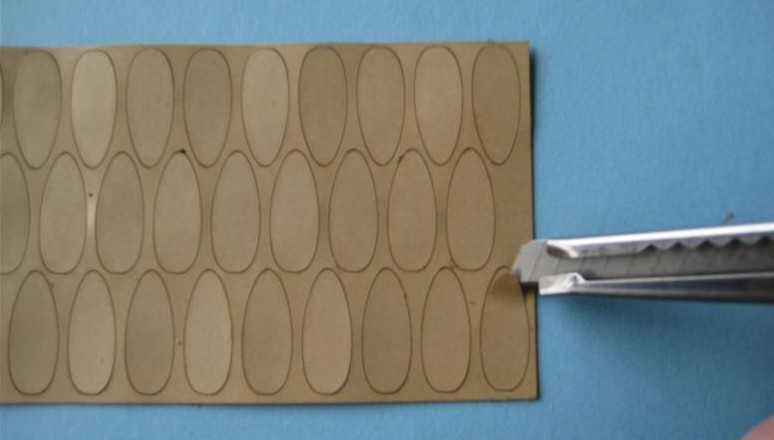
There may be kits out there, sent out before the pre-cut adhesive was available. In that case you can cut out the adhesive manually as below, or email stolspeed@gmail.com with your mailing address, and pre-cut adhesive will be supplied at no cost.
With a sharp trimming knife, slice the adhesive sheets lengthwise into 25mm (1in.) wide strips.
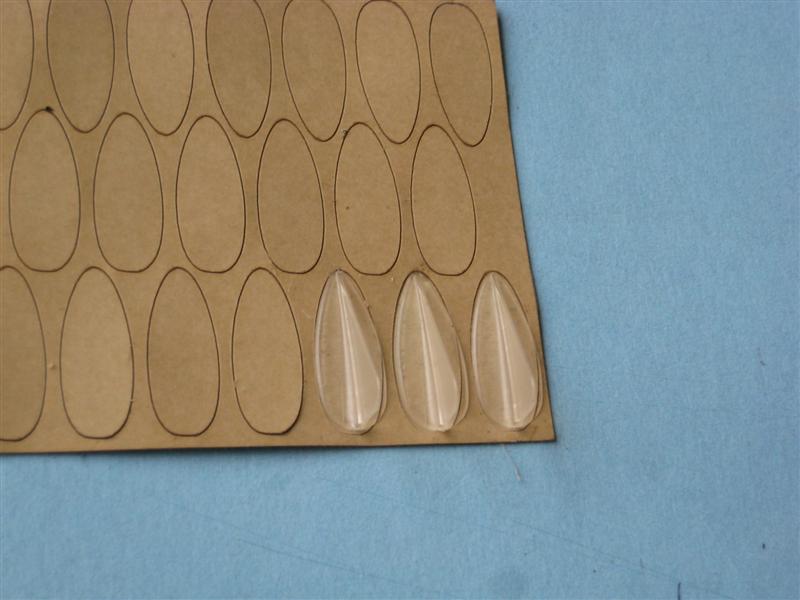
Peel back the shiny-side backing of the strip as you place the VGs side-by-side across the strip, and press them firmly onto the adhesive.
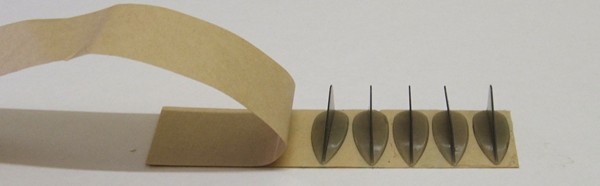
With the sharp trimming knife, cut around each VG, right through the backing under the adhesive. Those little, curved fingernail scissors are also ideal for this.Tip Its a bit fiddly for heavy fingers, but young females are really adept at it try to make a deal.......Rub the backing firmly with a fingernail to press the adhesive onto the VG and expel any air bubbles.
Determining the correct position for the Stolspeed VGs
The VGs need to be positioned such that they have the best bite at the airflow when the wing is at the stall angle of attack. If they are too far aft they risk being buried in the thickening boundary layer and the start of separation, so they lose effectiveness at stall. If they are too far forward they are reputed to slightly increase drag at cruise, but I have never been able to meaure such - better to be farther forward than too far aft. So, with the wing positioned at the stall angle of attack, the VGs should be slightly forward of the highest point of the airfoil.
Historically, the margin is considered to be 8-12% of wing chord back from the leading edge to the highest point of the VG, with most experience settling on 10% as the most appropriate. Theres lots of talk around the hangar fliers of finding the sweet spot, but my experience doesnt show any dramatic difference at any one point. My testing indicates that 15% can be too far back, so that at a very high angle of attack the VGs can become ineffective. From 8-12% I could detect no difference in stall performance at all, and couldnt measure any change in drag at cruise speed.
Those figures are to the highest point of the VG, but since it's easiest to measure to the front tips of the VGs, I recommend starting with the tips at 7% of chord aft of the leading edge - this puts the highest point of the VG at about 9%. We use the measurement to the tips of the VGs to mark the line on the wing because it's easier to place the VGs accurately to this line. If you try other positions and get significant results with your aircraft, please let us know so that others can benefit.
Preparing the wings
- Wash the wing thoroughly with detergent (not one of those automotive wash-and wax products).
- Measure the chord of the wing from the front of the leading edge to the aft edge of the ailerons or flaps. In the case of detached flaperons, measure to the aft edge of the flaperons.
- If the wing is tapered then measure both at the root and the tip.
- Measure from a vertical line extended above the leading edge.
- A carpenter's level is convenient to establish this vertical.
- Calculate 7% of each the those measurements.
- Measuring from the leading edge again, mark those 7% points on masking tape at the ends of each wing.
- Wipe a zone along that line with alcolhol.
- Stretch a string line tightly over those marks, and secure it with masking tape at a couple of intermediate points.
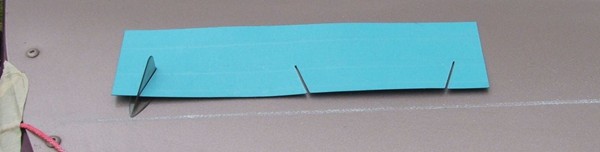
Placing the VGs on the Wing
- Starting 50mm (2) from each wing tip:
- Remove the backing from the adhesive on a VG.
- Set the first VG in a notch of the 60mm template with the nose angled out toward the wingtip.
- Carefully touch the very tip of the VG to the wing surface right behind the line.
- Guided by the angle of the template, lightly set the base of the VG onto the wing surface.
Double check the alignment, and if correct, press the VG firmly onto the surface.Rub each side of the base firmly with thumbnail or a popsicle stick to press out any air bubbles.With the template secured by the first VG, use the remaining notches to set two more VGs in place.
Move the template so that the end notch is secured by the last VG already set, and set two more.
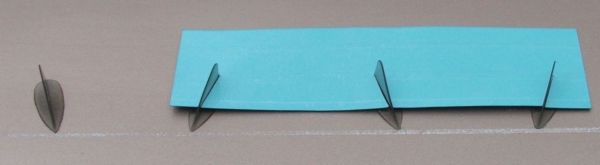
Continue to place 15 VGs at the 60mm spacing = 900mm (3ft) from the wingtip.(This closer spacing near the wingtip is to ensure that the tip does not stall first.)
Do the remaining portion of the wing with the 90mm spacing template.
120 VGs is enough to do 9.9 metres (32 ft) of wing at this spacing.
If a VG happens to land on a rivet or a seam, displace it just enough to miss the obstacle, then continue the regular spacing.
Placing VGs on the Horizontal Stabilizer
Stretch a line on the underside of the horizontal stabilizer, 100mm (4) in front of the gap between the stab and the elevator.
Using the 30mm spacing template, set a row of VGs with the front tips along that line, starting from the outside.
If the surface of the horizontal stabilizer is flat, the curved base of the VG will contact only at he tip and the heel. Rub the VG on a piece of sandpaper laid on a flat surface to adjust. Don't try to completely flatten the base - just make flat areas at the tip and heel, the adhesive will do the rest.
For a Wing with a swept-back leading edge
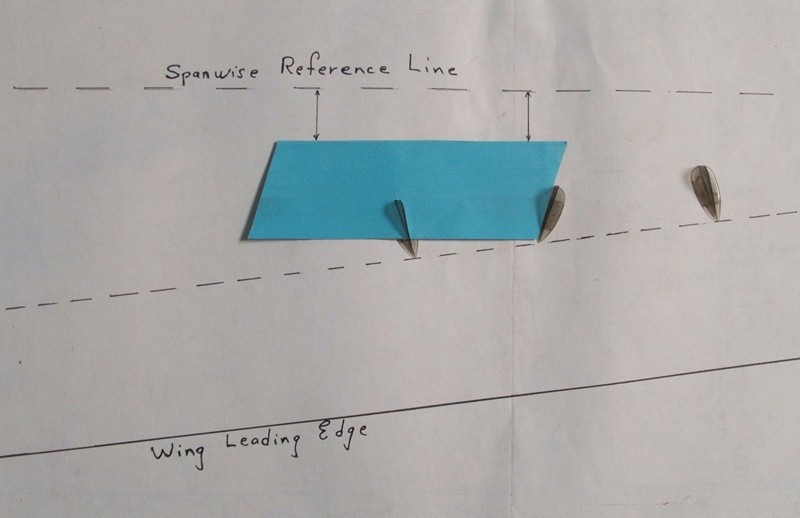
Since the VGs need to be oriented with respect to the airflow rather than the leading edge, a slightly different procedure is needed with a swept-back leading edge. The VGs are effective at angles from 10º to 20º, so setting them at 15º allows for best margin of variable airflow. There will be very little spanwise flow this far forward, so we can orient the VGs to a reference line at right angles to the centre line of the aircraft.
Snap a chalk line 7% back and parallel to the leading edge as before.
Snap a couple of spanwise reference lines at right angles to the aircraft centre line.
Cut the templates completely across at the end slots.
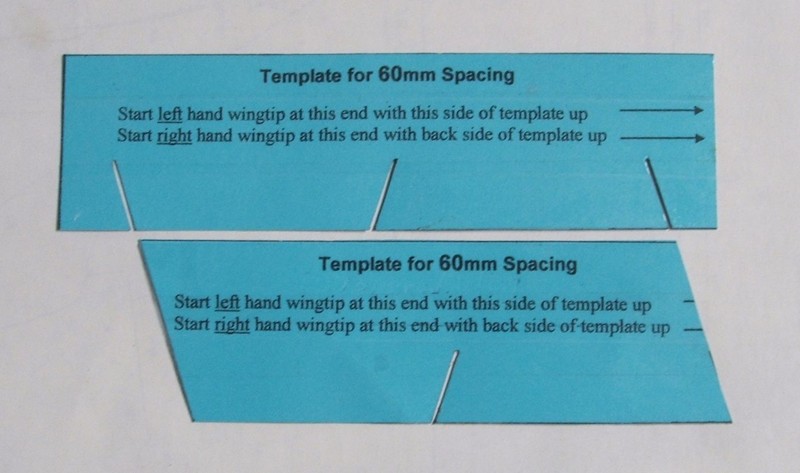
With the VG in the centre slot, and the VG tip on the 7% line, orient the template so that it is parallel to the spanwise reference line rather than the leading edge, with one end of the template against the fin of the last VG already placed.
Flip the template over, end for end each time, to match the angle of the previous VG.
Painting Stolspeed VGs
If your aircraft will be parked in the sun for much of the time, it's a good idea to paint the VGs. We have added the maximum UV protectant that is possible, but the thin section and transparency of these VGs will still allow some UV damage.
If you wish to paint your VGs, it is best done before they are installed on the wing and before the adhesive is applied to them. Even on a new aircraft its much better to first paint the wing without the VGs on, paint the VGs separately, then stick them on.
Staple a strip of masking tape, sticky side up, onto a length of wood.
Wipe the VGs with alcohol to clean off any release lubricant from the injection molding process.
Place the VGs inline along this tape, so that you can paint both sides easily.
Keep in mind that the VGs are flexible, so you wont want a thick layer of brittle two-pack paint. Keep the paint layer thin, and without hardener if possible.
Certified Aircraft
Please note that Stolspeed VGs are not approved for certified aircraft.
Note Be very careful when refuelling wing tanks Polycarbonate is very tough stuff, but fuel destroys it!
Videos


Reviews
Installed on the wing and elevator of a Wag-Aero Cub. Power off stall lowered from 39 to 32-33. No break at stall, just mushed forward and retained roll control. No rudder input was needed to prevent a spin. Easier landings requiring less rudder input with the slower, soft stall. No effect on cruise speed.
Great product great adhesive. ***Purchased for and installed on a radio control 1/4 scale supercub*** The 80pc kit was enough to do both wings at 60mm spacing and both stabs at 30mm spacing. May have been able to make something similar for less, but would have taken a whole lot of time and likely would not have been as consistent of a finished product. This kit is complete and comes with fantastic instructions and templates. Glad these were available !
Stolspeed Vortex Generators 80
Arrived with no instructions.
Stolspeed Vortex Generators 80
Arrived intact but no instructions at all.
Stolspeed Vortex Generator 120
Ive been hearing about these V gs for years and I always thought they were a gimmick and a joke, I recently installed them on a 172 project all the way around the transformation of this aircraft was beyond words... We just completed a phase of stall test and we are showing full control of the aircraft at 40 miles an hour or lower.. Incredible... Worth every penny...
Stolspeed Vortex Generators 80
Performs as advertised. These VGs were installed on my Zenith 701 wings as recommended by Stolspeed and Zenith following removal of the L/E slats. I have not done extensive testing as yet, but performance numbers from two short flights show much improved cruise and top end speeds at lower rpm’s, which translates to significant fuel savings. Stall speeds were about the same as with slats - 38 mph with full flaps. I highly recommend Stolspeed VGs to anyone looking to improve performance of their 701 based on my experiences. Weather permitting I expect further testing will show additional flight improvements.
Stolspeed Vortex Generator 120
Great product! Wonderful customer support.
Stolspeed Vortex Generator 120
StolSpeed VGs are great. They were very easy to install, and the adhesive tape was a game changer for me, as Ive used glue before on other VGs, and hated having to hold them in place while the glue set. They work really well, considering that I put them on surfaces that normally you dont see them, i.e. above the windscreen, to clean up airflow to my Zenith 750s tail.
Stolspeed Vortex Generators 80
For pennies its a big difference in stall speeds and stall characteristics. Worst case just pop them off and back to normal with no harm done to the plane. My package had no install templates which it shows its supposed to. I got lucky and a friend had the templates from his install so cant tell you about customer service, but product is easy to install once you get your mark placed. Highly recommend.
Stolspeed Vortex Generator 120
worked perfect. if you follow instructions wiping with denatured alcohol they stick and stay on.
Stolspeed Vortex Generator 120
Q&A
Please note, Aircraft Spruce Canada's personnel are not certified aircraft mechanics and can only provide general support and ideas, which should not be relied upon or implemented in lieu of consulting an A&P or other qualified technician. Aircraft Spruce Canada assumes no responsibility or liability for any issue or problem which may arise from any repair, modification or other work done from this knowledge base. Any product eligibility information provided here is based on general application guides and we recommend always referring to your specific aircraft parts manual, the parts manufacturer or consulting with a qualified mechanic.
Yes, we have added the manufacturer's installation instructions to the "Installation" tab of this web page. Please review them for all available installation details.
Per the supplier: The material (Makrolon) used to make the VGs is rated as being UV resistant by the manufacturer. Still, I think it's a good idea to paint the VGs if they are going to be in the sun all the time. The adhesive is very resistant to UV.
Per the supplier: Yes, I think VGs would have the same effect on such a bi-plane as any other wing. The VGs tend to stabilize the airflow, so that you don't get a sudden stall. So you can hold off to a slower speed and 'mush' on to a more gentle landing.
Per the manufacturer: "Experiments with vortex generators on rudders is quite variable. Some report good results but most don't find much effect. At low speeds I wouldn't expect a noticeable effect."
Yes, these kits include the templates for proper spacing.
No, these are for experimental aircraft.
That kit will do both wings.
Yes, these can be used on all experimental aircraft. They are commonly used on Vans aircraft.
The Stolspeed VGs are 12mm high and the base is 25mm long by 10mm wide.
PER THE MANUFACTURER: We do not have any experience with a biplane but VGs on any wing will stabilize the airflow and prevent abrupt stalls, so either wing would show a benefit but both wings would be the most effective.